CloudHub User Guide

This chapter provides detailed information about building, running, and operating the CloudHub device.

Introduction

CloudHub is the heart of the CoolSens system, providing measurement of environmental conditions, collection of measurement data and its transmission to the cloud.

Thanks to the built-in temperature and humidity sensors, the hub can operate independently, providing precise data on atmospheric conditions at the place of its installation. In addition, its ability to wirelessly communicate with other sensors allows for the collection and transmission of data from various measurement points.

By using a built-in e-ink display, the device offers a local view of the measured values.

Additionally, the CloudHub records and transmits to the system the value of atmospheric pressure.

Main features of the device

  • Dedicated sensor for temperature, humidity, atmospheric pressure
  • Integrated NB-IoT/LTE Cat. M1 modem
  • Packet data transmission
  • Temperature measurement range: +5 °C – +50 °C
  • Relative humidity measurement range: 0 – 100 %RH
  • Atmospheric pressure measurement range: 300 – 1000 hPa
  • Built-in E-paper (E-Ink) display, 122×250 px, 2.13”
  • Sound signal for alarm conditions
  • Data logger
  • Built-in radio interface for communication with external CoolSens Node sensors (up to 16 linked sensors)
  • Remote configuration, updates, and diagnostics
  • High measurement accuracy and stability
  • Low power consumption, intelligent energy management
  • Powered by high-current lithium AA batteries (3.6 V)
  • IP20 protection rating
  • Wall-mounted or free-standing installation
  • Built-in LED indicating device status
  • ABS enclosure measuring 76 x 76 x 31 mm
  • 2-year warranty
This chapter provides detailed information about building, running, and operating the CloudHub device.

Starting up

The CloudHub is supplied with batteries installed in the device and secured with insulating strips so that the device does not draw power. After removing the securing strips (or replacing the batteries with new ones), the hub starts the startup process itself.
  • The CoolSens logo and information about the device starting up appear on the screen.
  • The LED will start flashing green to indicate that the hub is starting up.
  • After logging into the GSM network, the LED will start flashing blue until the first measurement is taken.
  • After the measurement, the temperature and humidity values ​​will appear on the display, the diode will stop flashing. The device is ready to work, it will perform and transmit measurements according to the programmed intervals. To learn more about the device’s operating parameters, go to the Configuring the hub section.

Enclosure and Display

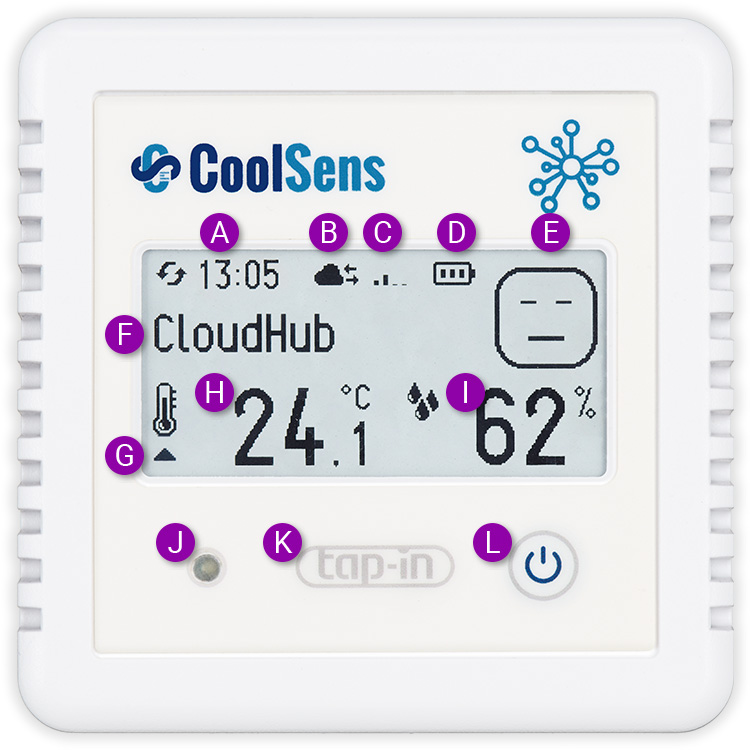
  1. Time of last sensor measurement received – shows the exact time when the hub last read data from the selected sensor.
  2. Device type whose data is presented on the display:
    • CoolSens CloudHub
    • CoolSens Node
    To change the device whose data you want to show on the display, press the multifunction button. The devices are changed in a loop, each time the button is pressed.
  3. Signal level important for assessing the quality of the network connection. Depending on whether data from a hub or a sensor is displayed (see above), the icon will mean:
    • GSM signal level for the hub;
    • Radio signal level for the sensor.
  1. Information about the battery status in the sensor.
  2. Measurement status – a smiling face means all parameters are within the norm, an unhappy face means that warning or alarm thresholds have been exceeded for the selected sensor. More information can be found below.
  3. Name of the hub or sensor – a name assigned by the User, usually the name of the room in which it is located, making it easier to determine its location.
  4. Icon indicating the exceedance of optimal temperature. A single arrow (up or ) indicates that the first threshold (warning) has been exceeded, a double arrow (hi-hi or low-low) indicates that the alarm value has been exceeded. Similar signaling applies to humidity measurements.
  5. Temperature last measured by the sensor.
  6. Humidity last measured by the sensor.
  7. LED indicator signaling the exceedance of optimal or alarm parameters (if such an option is enabled) and confirming actions related to the multifunction button, more information can be found below.
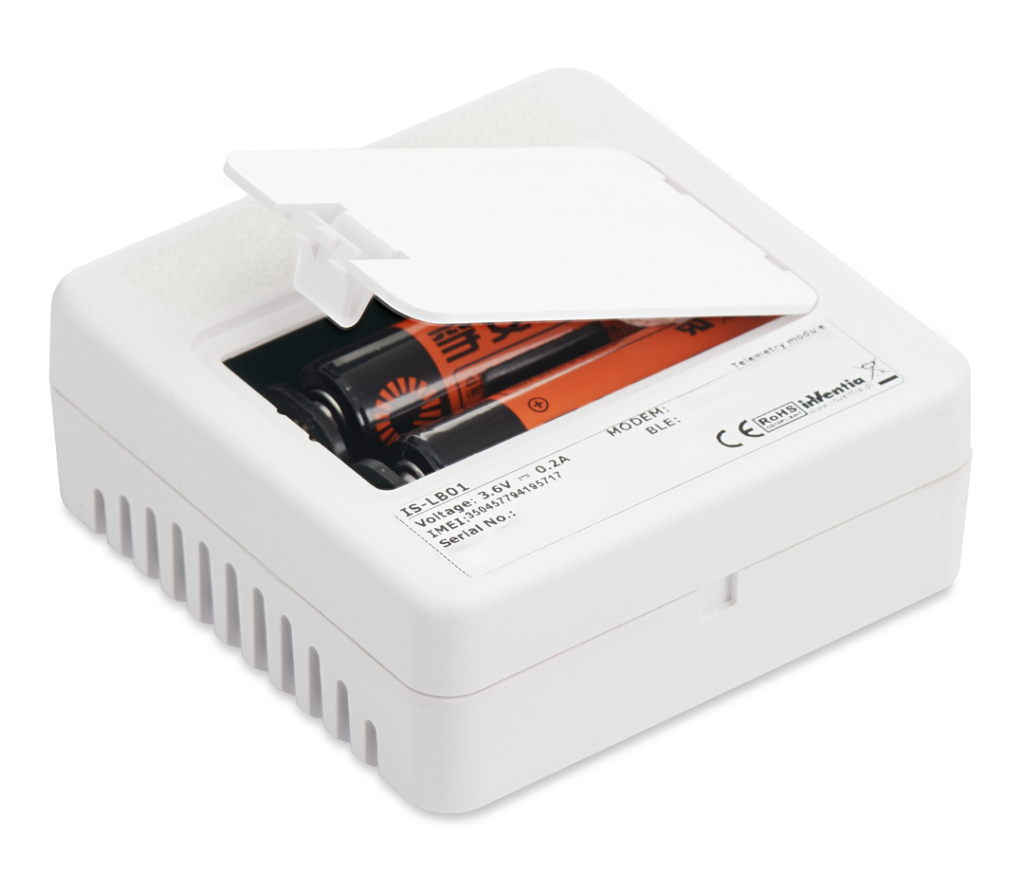
  8. The tap-in functionality uses NFC technology, allowing the User to quickly and conveniently read the serial number and device pin by bringing a phone supporting this technology close to the device.
  9. Multifunction button used, among other things, to switch views and register the hub with the server to speed up the configuration process. More information can be found below.

Measurement status indication

1-usmiech
OK

All measured parameters are normal (their values ​​are within the recommended ranges.

2-neutralny
Alert

Warning condition - recommended temperature or humidity ranges have been exceeded.

3-smutny
Alarm

Alarm status - alarm thresholds for temperature or humidity have been exceeded.

4-panika
SIM card problem

No SIM card or inactive

5-nieaktywny
No communication with the sensor

Sensor connection problem - check the batteries in the sensor or the variable location (if the signal is too weak)

Button and LED Indicator

The multifunction button plays a key role in operating the device, allowing you to switch views in a loop, which allows you to display data from different connected sensors. With this feature, the user can easily monitor different parameters without having to navigate through complicated menus.  The button has 3 different functions:

Switching between sensors

A short press of the button switches the view and displays data from the next sensor, if any are paired with the concentrator. Pressing the button is confirmed by a short single flash of the blue diode and a single sound signal (if the sound signal has been enabled in the concentrator settings). Another, this time longer flash of the diode signals the status of the measurement of the value from this sensor:
  • green color means that all measurements are normal (they remain within the optimal range);
  • orange color indicates that the warning threshold for temperature or humidity has been exceeded; single arrows will be visible next to the temperature and humidity icons, indicating whether the value is above (up) or below (down) the warning threshold;
  • red indicates:
    • threshold exceeded alarm for temperature or humidity; double arrows will be displayed next to the temperature and/or humidity icons, pointing up (hi-hi) or down (low-low);
    • no connection with the sensor – then the last measured values ​​are displayed along with the time of sending these values ​​to the server and “worried face”.
Each subsequent press of the button will display data from the next sensor connected to the hub. They will be changed in a loop, switching them is only in one direction.

Screen refresh

Holding the button for longer than 2 seconds refreshes the screen, returning it to displaying measurement data from the concentrator.

Pressing the button is confirmed by a short single flash of the diode blue and a single sound signal (if the sound signal has been enabled in the concentrator settings). After holding the button for 2 seconds, the diode will flash twice orange (which may be accompanied by a double sound signal). Then release the button to refresh the screen.

ClodHub wake-up

Holding the button for more than 4 seconds forces communication with the server. This functionality is extremely useful when programming devices. Then you don’t have to wait for the device to communicate with the server itself, which can take quite a long time (depending on the hub settings).

To wake up the hub, press the multifunction button – after two seconds the device will signal that it is ready to refresh the screen, but keep the button pressed. After 4 seconds, the LED will flash three times white (which will optionally be accompanied by a triple sound signal, if this option is enabled). Then release the button to force the device to connect to the server.

Alarm indication

During device operation, LED signaling provides important information about the status of measured parameters.
  • If the diode flashes orange with the frequency at which the measurement is taken, it means that at least one of the parameters measured by the sensors connected to the concentrator has exceeded the warning threshold. This is a signal to the user that they should pay attention to the monitored temperature and humidity values.
  • In turn, a double red flash of the diode indicates that the alarm threshold has been exceeded, which means a more serious deviation from the norm and requires immediate intervention.

Complete screen content clearing

CloudHub uses a screen using E Ink technology, which is characterized by, among other things, low energy consumption, which is used only when changing the information presented on the screen. A power source is not needed to maintain the image display, so after removing the battery, the last information displayed on the screen will still be visible.

If for some reason it is necessary to completely clear the image on the screen, press and hold the multifunction button for more than 10 seconds. CloudHub will clear the screen and turn off for a moment.

Battery change

To properly replace the batteries in your CloudHub, follow these steps:

  1. Preparation:
  • Ensure you have 2 new high-current AA lithium batteries with a voltage of 3.6V, FANSO ER14505M/S.
  • Disassemble the device by separating both parts of the Velcro fasteners.
  1. Removing old batteries:
  • Gently open the flap on the back of the device to access the battery compartment.
  • Carefully remove the old batteries, prying them out with a tool like a flat screwdriver if necessary.
  1. Installing new batteries:
  • Insert the new batteries into the compartment, making sure they are oriented in the same direction as the previous ones. Check that the polarity (+ and -) is correct – the markings on the batteries and in the battery compartment should match.
  • Once the batteries are in place, close the battery compartment cover, making sure it is securely fastened.
  1. Starting the device:
  • After installing new batteries, the device will start the startup process itself, after a few seconds it should be ready to work.
  • Place the device in the place from which you dismantled it, press the concentrator to the mounting surface so that the Velcro fasteners connect well.
  • Make sure the device is attached stably and securely.
Important information
  • Battery type: Always use 3.6V AA batteries type ER14505M. Using other types of batteries may damage the device.
  • Polarity: Make sure the batteries are oriented according to the (+ and -) markings in the battery compartment.
  • Safety: Change the batteries in a dry and safe place, away from sources of fire and high temperatures.
Disposal of used batteries
  • Used batteries: After replacing the batteries, remember to dispose of used batteries properly.
  • Collection points: Used batteries can be taken to special battery collection points, which are located in electronics stores, supermarkets or recycling centers.
  • Environmental Safety: Do not throw used batteries into household waste. Batteries contain chemicals that can be harmful to the environment if not disposed of properly.
  • Local information: For detailed information on collection points and recycling procedures, contact your local authorities or waste management company.

Maintenance

  • Use a soft, dry cloth to clean the outer casing.
  • For more difficult stains, you can lightly dampen the cloth with water and a mild detergent, but avoid over-soaking the cloth so that water does not get inside the device.
  • Never use aggressive cleaning agents such as solvents, alcohol or gasoline, which may damage the surface of the casing.

Technical data

General
  • Dimensions: 76 x 76 x 31 mm
  • Weight(with batteries): 120 g
  • Protection class: IP20
  • Mounting method: Velcro
GSM Modem
  • Modem type: Nordic nRF9160
  • LTE Cat-M1 bands: B1, B2, B3, B4, B5, B8, B12, B13, B14, B18, B19, B20, B25, B26, B28, B66
  • Cat-M1 LTE Bands: B2, B3, B4, B5, B8, B12 , B13, B17, B19, B20, B25, B26, B28, B66
  • Built-in antenna: 50 Ω
Power supply
  • Battery type: 2 x 3.6V high-current lithium battery, FANSO ER14505M/S, AA (R6)
  • Capacity: 2100 mAh or 4200 mAh
  • Working time: up to 1 year*

*The operating time of the concentrator without the need to replace the battery depends on many factors, such as: frequency of measurement and data transmission, device configuration, cellular network parameters and environmental conditions.

Air temperature measurement
  • Range: +5 °C – +50 °C
  • Measuring accuracy: typically ± 0.2 °C
  • Measuring resolution: 0.1 °C
Air humidity measurement
  • Range: 0% – 100%
  • Measuring accuracy: ± 3%
  • Measuring resolution: 1%
Atmospheric pressure measurement
  • Range: 300 – 1100 hPa
  • Measurement accuracy: ± 0.6 hPa
  • Measurement resolution: 1 hPa
Radio parameters
  • Transmitter power: max. 8 dBm
  • Number of associated sensors: Up to 16 pcs.
Additional features
  • Display: E-paper (E-Ink), 2.13”, 122 x 250 px
  • Interface: RGB LED, multi-function button

In this chapter