Hub configuration
This chapter contains detailed information on configuring the operational parameters of the CloudHub concentrator.
Each hub is pre-configured at the factory, with default operational ranges, measurement frequency, and data transmission settings. Once it is turned on and added to an account, it will start measuring and transmitting data to the system.
However, it can be assigned a new name, provided with an additional description and location, and configured with recommended operational ranges and alarm thresholds to meet the specific requirements of the user.
Adding a CloudHub
The hub is an essential element of the system. If its serial number was used to create an account in CoolSens, it will be automatically registered to the account and does not need to be added. Go to the next step.
If you used one of the wireless sensors to create an account or want to add another hub, follow these steps:
- Launch the CoolSens app and display the Dashboard.
- Click the add devices button at the bottom of the screen.

- Launch the CoolSens app and display the Dashboard.
- Click the add devices button at the top of the screen.

- Enter the device’s Serial Number and Activation Code.
- Proceed to configure it according to the instructions below.
Description of the configuration process
The hub is a battery-powered device that communicates with the server at programmed intervals.
The sensor programming process consists of two main stages: making changes on the server side and actual programming of the device when it communicates with the system.
Step 1: Making changes on the server side
- Select the device you want to configure and switch to configuration mode.
- Modify settings such as the name, alarm thresholds, paired sensors, and measurement and communication interval.
- After making all the changes, click the SAVE button to confirm the new settings.
The system will save the changes and prepare the new settings to be sent to the device.
Step 2: Programming the device
- The system will enter the waiting mode for contact from the device that communicates with the server at programmed intervals. The waiting will be signaled by the gear icon displayed on the modules whose configuration has been changed.
- When the concentrator establishes a connection, the server automatically sends the new settings to the device.
- After receiving confirmation of the successful programming of the device, monitor its operation for a period to ensure that the new settings are applied correctly.
The following section of this chapter provides a detailed description of each programming stage and explains the significance of the various operational parameters.
Configuration mode
The hub configuration is available from the application level for authorized system users (administrators). To go to the device configuration, follow these steps:
- Launch the CoolSens app and display the Dashboard.
- Find the device you want to configure on the dashboard and click the MORE button to view detailed information about the device.
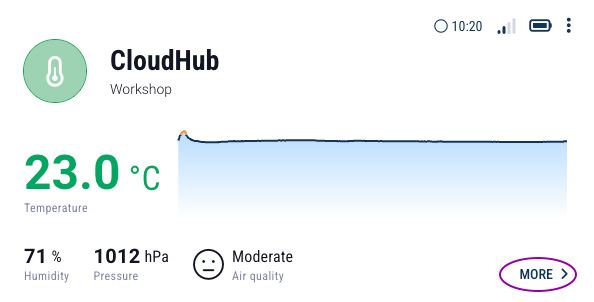
- Click the CONFIGURE button to proceed to editing and configuring the device.

- Launch the CoolSens app and display the Dashboard.
- Find the device you want to configure on the dashboard and click the MORE button to view detailed information about the device.
 Click the configuration button to proceed to editing and configuring the device.
The configuration form allows you to change the device’s name, description, and location. The remaining parameters are grouped into three tabs:
- OPERATIONAL RANGE: Here you can set recommended operational ranges and alarm thresholds, exceeding which will trigger the sending of alerts and alarms. Learn more here.
- NODE SENSORS: This tab contains a list of wireless sensors connected to the concentrator, and also allows temporary deactivation/activation, disconnection from the concentrator, and connection of sensors that are not paired with another concentrator. Learn more here.
- PARAMETERS: This tab includes additional parameters that affect the device’s operation, such as the frequency of measurements and transmissions, and the configuration of the buzzer and indicator light. Learn more here.
Name and description
The Device Name should uniquely identify the device. It is most commonly the name of the room where the device is located or the name of the monitored device or product.
The Description of the concentrator is an optional parameter that can help with the localization or identification of the device.
Operating range
CoolSens devices allow you to set warning and alarm thresholds for temperature and humidity. Exceeding these thresholds triggers the sending of alerts and alarms.
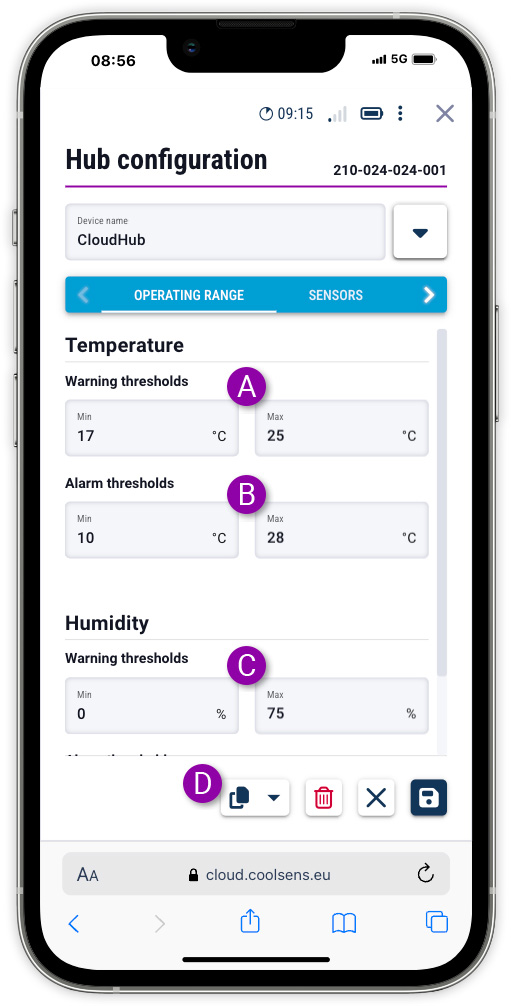
The OPERATING RANGE tab allows you to specify four ranges, two each for temperature and humidity.
To better visualize these ranges, they are displayed as sliders, which can be adjusted by dragging the ends with the mouse. If the sliders lack precision, the values can also be entered directly in the editable fields.
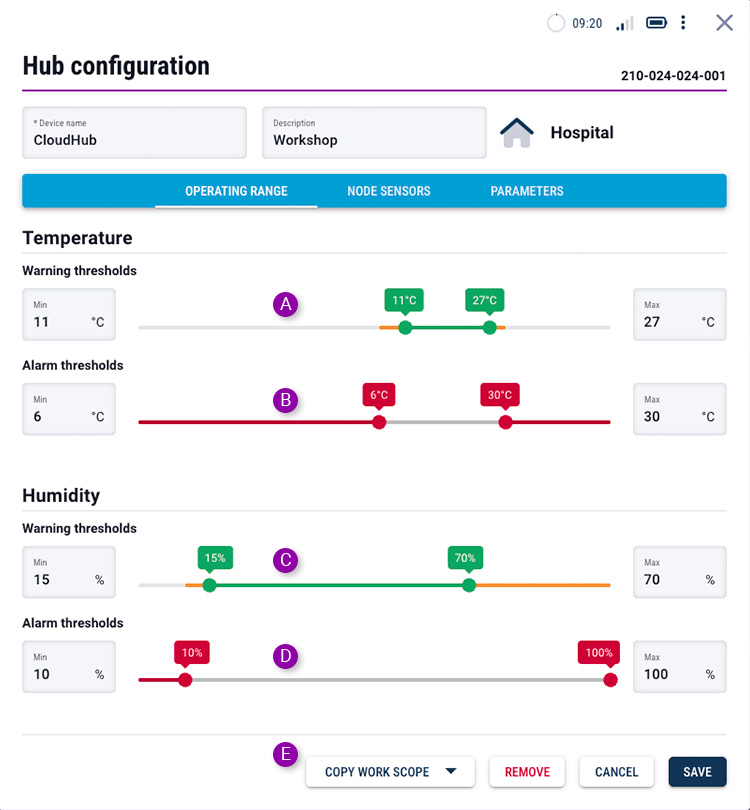
- Temperature Warning Thresholds: If the measured temperature falls within this range, its value will be displayed in green, and the status icon will also be green (provided other parameters are normal). Exceeding warning thresholds will result in an alert being sent (if notifications are enabled), and the displayed temperature and status icon will be shown in orange.
- Temperature Alarm Thresholds: If the temperature readings go beyond the specified minimum and maximum, the system will trigger an alarm. The temperature values and status icon will be displayed in red, and appropriate notifications will be sent (depending on the configuration).
- Humidity Warning Thresholds: If the measured humidity falls within this range, its value will be displayed in green, and the status icon will also be green (provided other parameters are normal). Exceeding warning thresholds will result in an alert being sent (if notifications are enabled), and the displayed humidity and status icon will be shown in orange.
- Humidity Alarm Thresholds: If the humidity readings go beyond the specified minimum and maximum, the system will trigger an alarm. The humidity values and status icon will be displayed in red, and appropriate notifications will be sent (depending on the configuration).
- COPY WORK SCOPE: The selection button allows you to copy temperature and humidity range settings from other devices (or enter default values).
- Temperature Warning Thresholds: If the measured temperature falls within this range, its value will be displayed in green, and the status icon will also be green (provided other parameters are within normal limits). Exceeding warning thresholds will result in an alert being sent (if notifications are enabled), and the displayed temperature and status icon will be shown in orange.
- Temperature Alarm Thresholds: If the temperature readings go beyond the specified minimum and maximum, the system will trigger an alarm. The temperature values and status icon will be displayed in red, and appropriate notifications will be sent (depending on the configuration).
- Humidity Warning Thresholds: If the measured humidity falls within this range, its value will be displayed in green, and the status icon will also be green (provided other parameters are within normal limits). Exceeding warning thresholds will result in an alert being sent (if notifications are enabled), and the displayed humidity and status icon will be shown in orange.
Humidity Alarm Thresholds: If the humidity readings go beyond the specified minimum and maximum, the system will trigger an alarm. The humidity values and status icon will be displayed in red, and appropriate notifications will be sent (depending on the configuration). - COPY OPERATIONAL RANGE: The selection button allows you to copy temperature and humidity range settings from other devices (or enter default values).
Paired wireless sensors
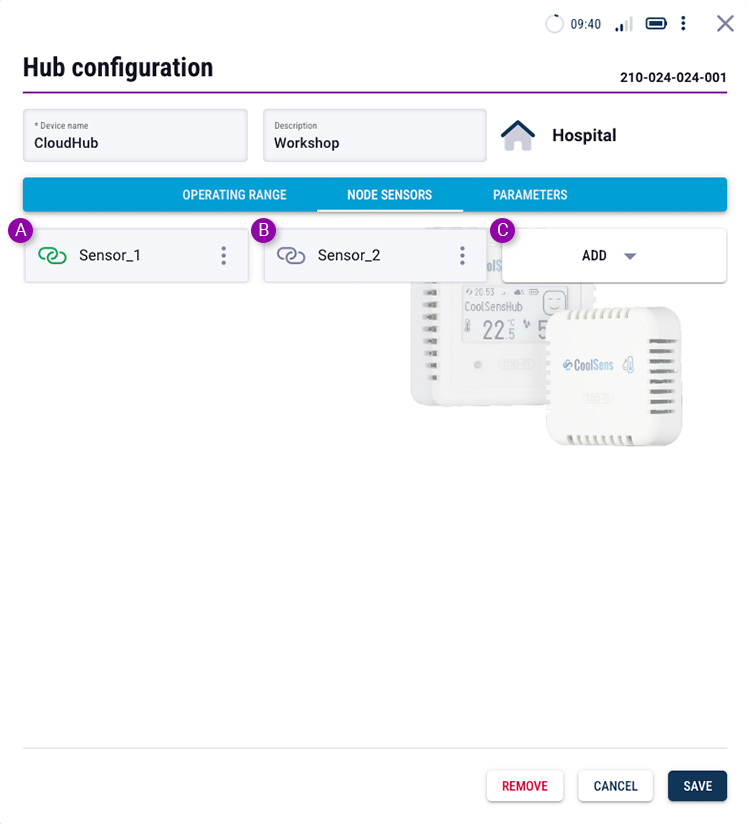
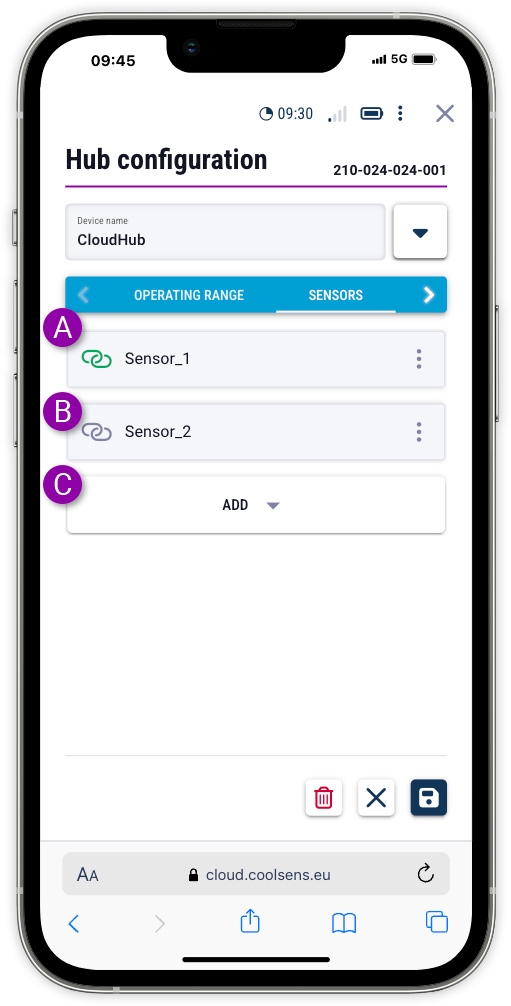
- A green icon next to the sensor’s name indicates that it is paired with the concentrator and is transmitting data to the system.
- A gray icon next to the sensor’s name indicates that it has been deactivated—while it is still paired with the concentrator, it is not transmitting data (transmission has been intentionally stopped by the user).
Pairing and disconnecting the sensor from the hub
- The ADD button displays a list of all sensors on the account that are not paired with any concentrator. Selecting a sensor from the list will pair it with the given concentrator.
If you want to add a new sensor to the account, use the add new devices button (+) visible on the Dashboard.
CoolSens wireless sensors must be paired with a hub to send data to the system.
If for any reason you want to disconnect a sensor from the hub, you can do so at either the sensor or the hub.
- In the concentrator configuration mode, select the NODE SENSORS tab.
- Select the sensor you want to disconnect from the concentrator and click the more button (with three dots).
- From the dropdown menu, select the command Disconnect from hub.
Sensor deactivation and activation
Deactivating a sensor can be useful in situations where, for example, the refrigerator in which it is placed must be turned off for some time, so we do not want data to be transmitted from the sensor, especially alarm signals.
We can therefore temporarily block the transmission of data from a selected sensor.
- In the concentrator configuration mode, select the NODE SENSORS tab.
- Select the active sensor you want to temporarily disable and click the more button (with three dots).
- From the dropdown menu, select the command Deactivate sensor.
Reactivating a sensor from the sensor level is extremely simple. Select it from the list and from the dropdown menu, choose the command Activate sensor.
- In the concentrator configuration mode, select the NODE SENSORS tab.
- Select the inactive sensor you want to reactivate and click the more button (with three dots).
- From the dropdown menu, select the command Activate sensor.
Additional Parameters
The PARAMETERS tab contains additional configuration parameters, such as sound signal settings or alarm LEDs.
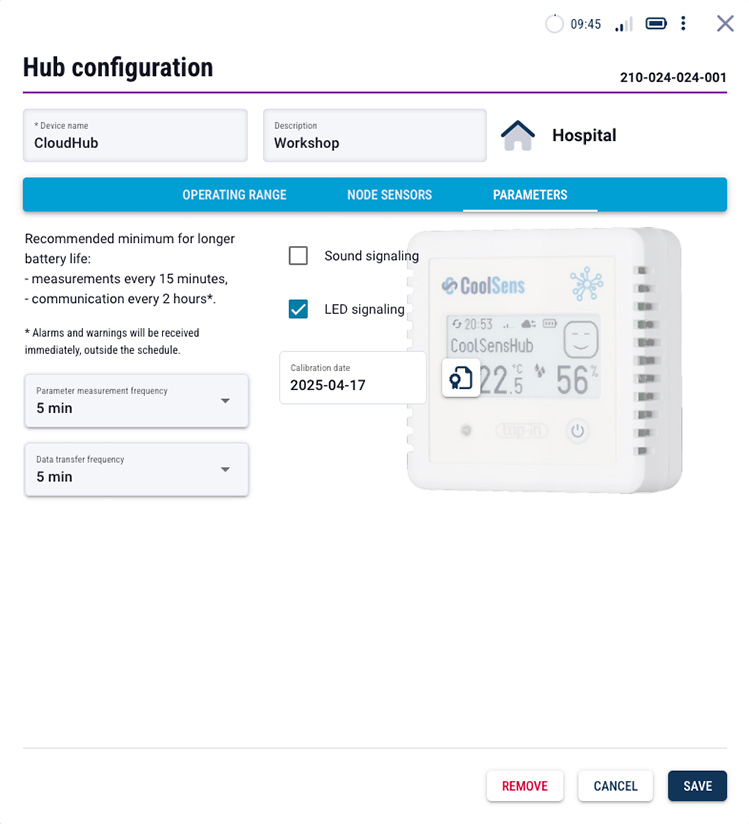
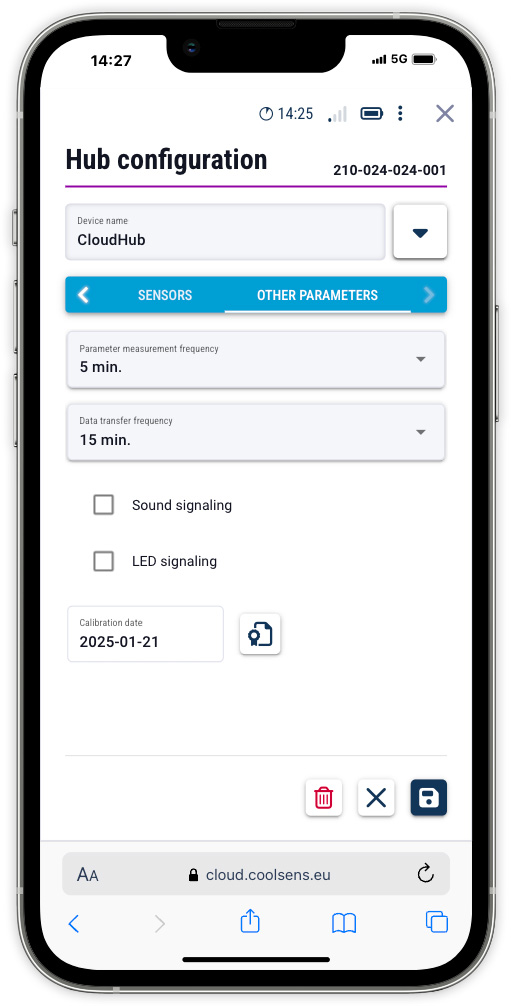
Working frequencies
- Parameter Measurement Frequency: This parameter determines how often measurements are taken from the sensors paired with this device. Measurements can be taken as frequently as every 1 minute or as infrequently as every 24 hours.
- Data Transfer Frequency: Measured parameters can be sent immediately after measurement or less frequently, in which case they are stored in the concentrator and transmitted in ‘batches’.
The data transfer rate cannot be higher than the measurement rate (then the same data would be sent). Therefore, after setting the measurement rate, there are no lower rates available in the sending rate value selection field.
- setting measurements no more often than every 15 minutes and
- sending data to the server no more often than every 2 hours.
Signaling
- Sound Signal: When warning or alarm thresholds of the sensors connected to the concentrator are exceeded, the concentrator can signal such an event with a single or double beep, respectively (with each measurement taken). Disabling this option helps extend the concentrator’s battery life.
- LED Signaling: Similarly, the device can signal warning and alarm events using an LED flash. A single orange flash at the time of measurement indicates that the optimal range measured by the concentrator or one of the connected sensors has been exceeded. A double red flash indicates that the alarm thresholds have been exceeded.
Date and calibration certificate
The system allows you to upload sensor calibration certificates as attachments (PDF files) directly in the sensor configuration panel, in the “OTHER PARAMETERS” section. Thanks to this, all calibration confirmation documents are stored centrally and easily accessible in the event of an audit or technical review. Uploading the certificate is optional, but recommended in order to maintain a full calibration history of a given sensor.
Uploading the certification certificate
To add a PDF file with the certificate, click the button next to the date field, which shows the last certification date.
- If no certificate has been added yet, the date field will be empty, and clicking the button will open a window for selecting a file from your local disk.
- If a certificate has already been added, clicking the button will display a list of uploaded files. To add a new certificate, click the button with the plus icon.
Then, select the PDF file on your local disk that you want to upload to the server.
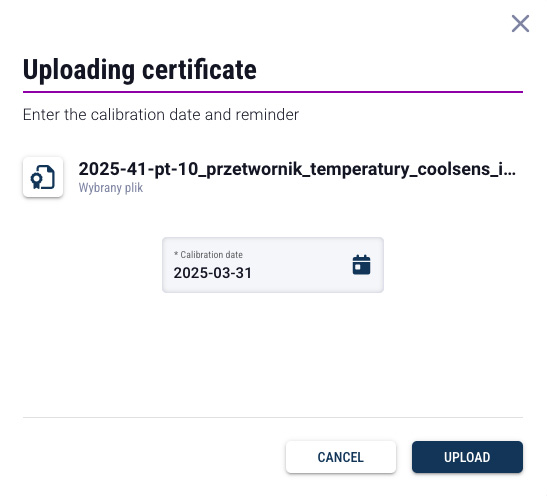
After selecting a PDF file on your local drive, a dialog box will appear allowing you to enter the sensor calibration date. The current date is entered by default, but you should select the date that appears in the document.
Once you have verified that the correct file has been selected and entered the calibration date, click the UPLOAD button to save it to the CoolSens server.
Overview of calibration certificates
Click the view calibration certificates button next to the last calibration date field to display a table of previously uploaded certificates.

The first column contains calibration dates entered by users when uploading files.
The next three buttons at the end of each certificate row allow you to:
- view the certificate file,
- edit the certificate date,
- delete the certificate file.
Change of location
When you create an account, the hub is added to the default location. For subsequent hubs, the location is specified when you add them to the system.
If you want to move a hub to a different location than the one previously assigned, follow the steps below.
- View details of the hub you want to move to another location.
 Then click the button that shows more commands.
- Select the CHANGE LOCATION command, which will display a form:
- View details of the hub you want to move to another location.
- Then click the button that shows more commands.
 Select the CHANGE LOCATION command, which will display a form:
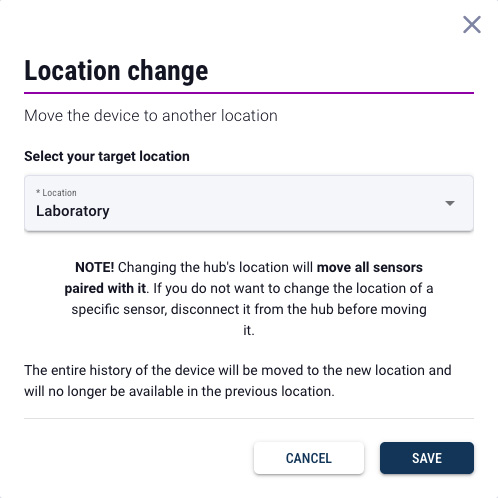
- In the selection field, select the target location.
- Click the SAVE button to confirm the change.
Removing the hub
To remove a hub from your account, in device configuration mode, click REMOVE.
To remove the concentrator from the account, in the device configuration mode, click the remove command.
![]()
Saving configuration to the hub
Any changes made by the User in the system are first saved on the server before being saved on the device.
After clicking the SAVE button in the device configuration form, a Configuration button will appear at the top of the window, indicating that changes have been made to the system settings and need to be sent and saved on the devices.
Any changes made by the User in the system are saved on the server before they are saved on the device.

After clicking the Save button in the device configuration form, a Configuration button will appear at the top of the window, indicating that changes have been made in the system settings that need to be sent and saved on the devices.
The system will wait for the concentrator to contact the portal. To save battery, the concentrator goes to sleep between data transmission periods. The concentrator checks in with the portal at intervals defined by the Data Transfer Frequency parameter.
Once the CloudHub connects to the portal, the new configuration is sent and saved to the device.
The programming process is indicated by the rotation of the gear icon on the programming button.
For more information about the configuration sending process and programming the concentrator, refer to the section Saving Configuration.